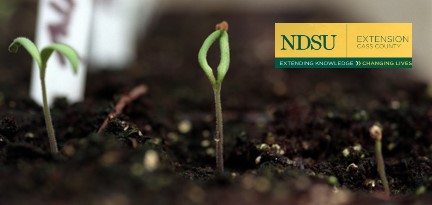
Seeds can be started indoors now for homegrown transplants we’ll use in flowerbeds and vegetable gardens in May. Growing even a few of our own plants is fascinating and gives a whole new meaning to spring. 
Dates to start seeds indoors are determined by the date you plan to “set them out” (garden talk for transplanting into flowerbeds and gardens). Each plant type requires a certain number of weeks to grow from seed into usable transplants.
In our region prime outdoor transplanting dates are between May 15 and 25. By counting backwards the necessary number of weeks, we can establish indoor seeding dates for each flower or vegetable type. 
March 1-5 (10 weeks) – impatiens, petunia, snapdragon, lobelia, dusty miller, ageratum, coleus, vinca, verbena, fountain grass.
March 15-20 (8 weeks)– alyssum, dahlia, dianthus, salvia, broccoli, cauliflower, cabbage, peppers, eggplant.
April 1 (6 weeks) – tomato, lettuce, oregano, cleome, celosia, marigold, nicotiana, statice.
April 15-20 (4 weeks) – Cosmos, calendula, nasturtium, four o’clock, zinnia, basil.
May 1 (2 to 3 weeks) – squash, pumpkins, cucumbers, zucchini, watermelon, muskmelon.
Tips for Starting Seeds Indoors:
Materials needed: Use soil-less seed starting mixes like Jiffy Mix, Miracle Gro Seeding Mix, Burpee Seeding Mix or one recommended by your local greenhouse. 
Containers should be about 2 inches deep such as greenhouse trays or clear plastic containers recycled from the bakery or deli section of the grocery store. Be sure to poke or drill drainage holes in the bottom. Use separate trays for each type because seeds grow at different rates. Also needed are wooden or plastic labels or stakes. We make our own by cutting plastic milk jugs into stakes 4 inches long and 1 inch wide. 
Why not seed directly into the final larger pots or cell-packs? Why seed into trays and then transplant? Because it’s easier to provide optimum germination conditions for a seed tray than a larger grouping of pots. Seedlings become stockier as you transplant them slightly deeper into the final container. Transplanting makes the seedlings more vigorous.
Procedure:
- Moisten the seeding mix the previous day by adding water to the bag and stirring by hand. Dry mixes can be difficult to water after seeding. Seal the bag, and the next day the mix will be moist and mellow.

- Fill containers to the top with mix, then gently firm and level. The mix will settle upon watering. Filling the tray all the way up is important for seedling root development and better drainage.
- Seeds may be broadcast over the surface of the mix or planted in rows. Press a ruler or pencil into the mix to make shallow furrows.

- Planting depth is important, and it’s usually shallower than we might expect. Small seeds like petunia, or any the size of a poppy seed and smaller can be merely spread on the surface of the mix and pressed gently. Larger seeds can be sown into a furrow and covered with mix, or place the seeds on the surface and sprinkle mix over the top.
- Label with variety and date.
- Water gently after seeding with a fine mist or sprinkling can. Use lukewarm water to wake up the mix and stimulate seed growth.
- Cover the container with plastic wrap or a clear lid to conserve warmth and humidity. If thoroughly moistened, seed trays usually don’t require watering until after seeds have sprouted.
- The most important ingredient for successful seed germination is warm soil between 70 and 80 degrees. Electric seed germination mats are available at garden centers or online, and are well worth an investment that will last for years, and they aren’t too expensive. Seed trays are placed onto the mats, which provide good bottom heat. If soil is too cool, germination is reduced or delayed. Window sills are poor because they’re warm during the day but cold at night.

- Peek at the seed tray several times each day. Most seeds take 7 to 10 days to germinate. Larger seeds sprout quicker. As soon as seedlings emerge from the soil move the container to bright light, and emove the plastic covering. If seedling aren’t given light immediately upon germination, they stretch and become spindly. I prefer to place the germination trays under lights kept on continually until seedlings appear.
- After germination, light is vital. Ordinary fluorescent shop lights work well, or tube-type LED’s or plant lights. Locate seedlings two inches below the bulbs, or follow the directions for plant-type lights. Lights can be kept on 24 hours a day for most plants, or after germination provide 16 hours of light and 8 hours of darkness. Timers are convenient. If seedlings are grown in a bright sunny window rotate daily.

- Room temperature for “growing on” is best reduced to 65 or 70 degrees. Gently water as needed, but begin allowing mix to dry to encourage root depth.
- Seedlings respond greatly to half-strength water-soluble fertilizer applied once or twice a week in place of the regular watering, especially after they are transplanted out of the seed tray and into cell-packs or pots.
- When seedlings have developed a pair of “true” leaves they are ready to transplant from the seed tray into individual cell-packs or pots for continued growing on. At this stage, use an all-purpose potting mix of high quality.


I’m done with most of my seed starers already. There are few vegetables that need some short tine for starting and I have a free week for just watching and caring for my currently started seeds. My girls can’t wait for transplanting in the garden and are also caring for the seedlings at home. Thank you for the helpful information. Happy gardening!